
by Ruddy Gunawan
Datara can help you build fully automated data pipelines within the AWS ecosystem. Our expertise lies in maintaining various ETL jobs, implementing robust storage solutions in AWS, and creating efficient data warehousing and data lake systems.
To demonstrate our capabilities, I'll walk you through our sample repository on GitHub, where it showcases our capabilities in:
- API data extraction
- Using S3 buckets for data lake storage (both flat and partitioned structures)
- Athena query implementation
- Data transformation and loading into Redshift Serverless
- Pipeline orchestration using Step Functions
- Periodic execution via EventBridge
We can do far more complex data pipelines than this, but this sample repository serves as a good starting point to understand our capabilities. Let's get right to it!
Step 1: Get the Original Data and Store It In S3 Bucket
For this demonstration, we utilize RapidAPI's Amazon Best Sellers dataset. Access this dataset through this RapidAPI link. After registering your account, you'll be able to see your RAPIDAPI key. Make sure to save that information.

S3 Configuration Steps
Once you have your API key, you need to go to your AWS console, and create a new S3 bucket. Here are the steps that you need to do:
-
Create an S3 bucket named
amazonbestsellers- this will serve as our data lake storage -
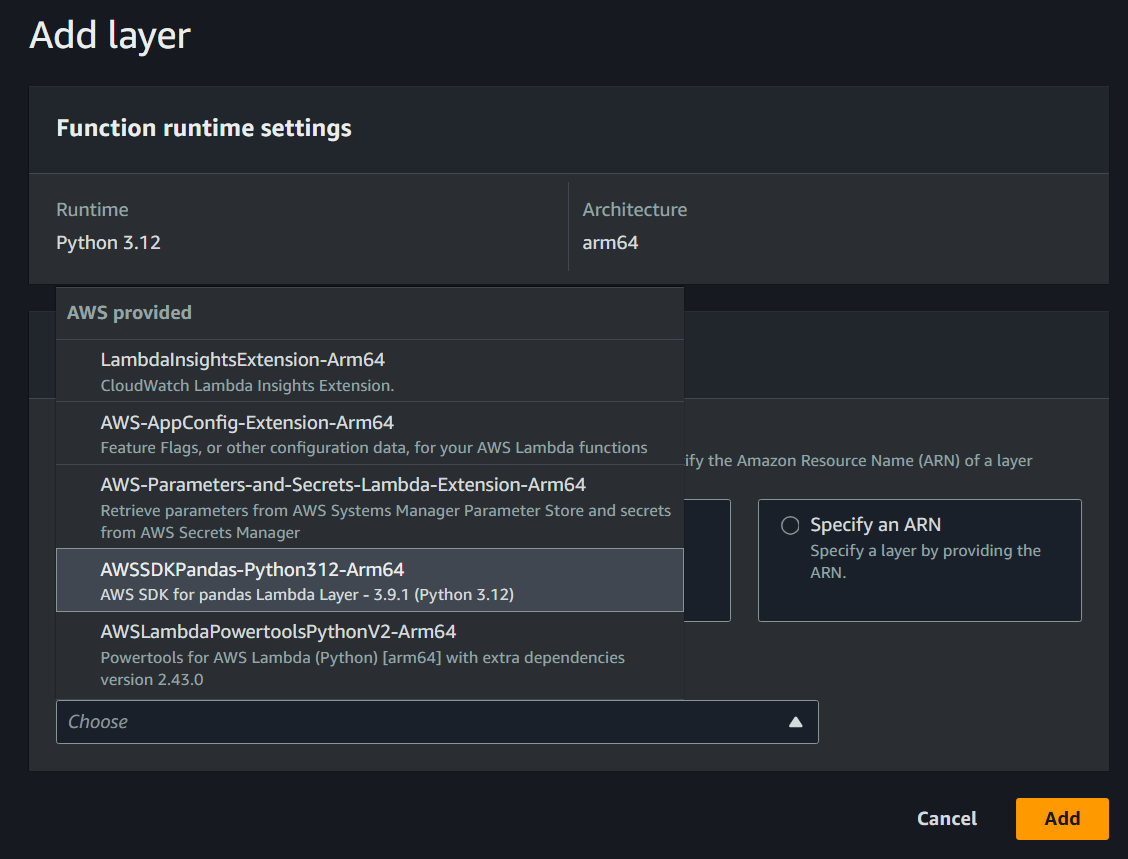
Configure AWS Lambda function to fetch the Amazon data from RapidAPI - You can check my Lambda function lambda_fetch_rapidapi_to_s3.py. This function will store the data in Parquet format with partitioned structure inside your S3 bucket.
-
For the Lambda configuration, you need to add a new layer (AWS SDK for pandas Lambda layer):
Regarding the IAM role of this Lambda function, add a policy to access the S3 bucket. You can check my IAM policy here to get the idea: AWSLambdaRole-LambdaS3AccessPolicy.json.
Also, in the Lambda function configuration, make sure to edit the environment variable and add RAPIDAPI_KEY as the key, and the API key value from RapidAPI website as the value.
Note on Data Structure: The above Lambda function will store the data in partitioned structure like below:
category={category}/year={year}/month={month}/day={day}/amazonbestsellers_{category}_{timestamp.strftime('%Y%m%d')}.parquet
If you need to store the files in flat structure instead, you can check my alternative Lambda function here: lambda_fetch_rapidapi_to_s3_flat_structure.py. This function will not partition the data, and store it in the root of the S3 bucket. The flat structure, however, is not recommended for large datasets.
Step 2: Set Up Glue Crawler and Athena
Glue Crawler Setup:
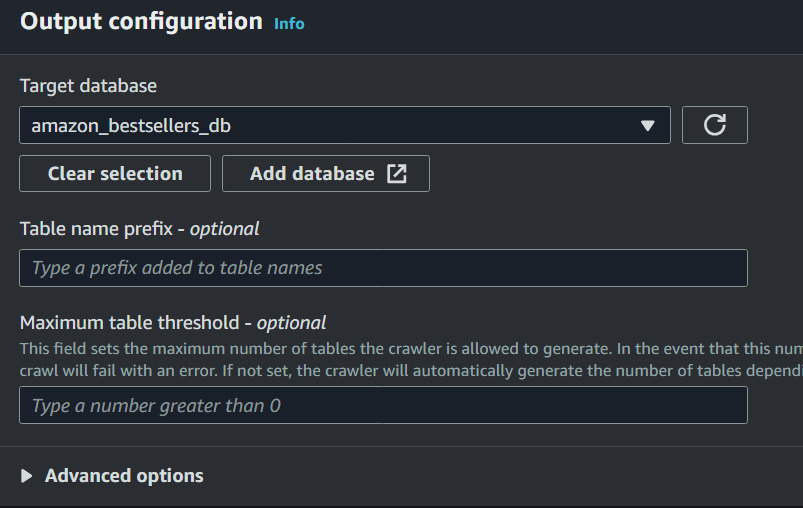
Next, go to AWS Glue and set up a crawler. In the crawler settings, add a data source, which is the S3 bucket we've created previously amazonbestsellers. You can check the below screenshot for output configuration example, make sure to add a new database because we will use it to query in Athena. Afterward, you can just run the crawler.
Athena Implementation:
After the Glue crawler has completed its task, it should automatically create a table that you can query in Athena. Go to Athena, set up query result location in S3, choose Trino SQL, and select that same database that we created previously in the Glue crawler. The table should already exist by now, alongside with the partition columns (category, year, month, day).
In Athena, you can also create a table manually, with CREATE EXTERNAL TABLE SQL command. Make sure to define the S3 bucket location as well as the partition columns in the same command. Then, use the MSCK REPAIR TABLE command to discover the existing partitions. However, it's more convenient to just use the table that's automatically created by the Glue crawler.
Once you confirm that the table has been created, you can start querying the data in Athena. Here's an example query to check the "kitchen" category. Keep in mind that querying in Athena is more efficient when you use the partition columns in the WHERE clause.
SELECT *
FROM amazonbestsellers
WHERE category = 'kitchen'
ORDER BY fetch_timestamp DESC
LIMIT 5;
Step 3: Set Up Redshift Serverless
Configuration Steps:
- Create workgroup and namespace
- Configure custom admin username and password
- Make sure this new Redshift workgroup publicly accessible
- Configure the VPC's security group - Add a new inbound rule in the security group. Add Your IP address to the VPC security group's new inbound rule for the "source". The default port for Redshift is 5439. Use TCP protocol.
To connect from a third-party software to Redshift serverless, you can use your own preferred software. What I use is this tool called SQL Workbench/J. you can always use Query Editor v2 from the left sidebar in the console if you dont want to use any third-party software.
To set up a Redshift table, you can use this SQL script:
CREATE TABLE amazonbestsellers_redshift (
    unique_id BIGINT IDENTITY(1,1),
    product_num_ratings INT,
    rank INT,
    product_star_rating DOUBLE PRECISION,
    category VARCHAR(255),
    product_photo VARCHAR(1000),
    product_url VARCHAR(1000),
    currency VARCHAR(10),
    short_product_title VARCHAR(500),
    product_title VARCHAR(1000),
    asin VARCHAR(50) NOT NULL,
    fetch_timestamp TIMESTAMP,
    product_price NUMERIC(10,2)
);
COMMIT;
Step 4: Create AWS Glue Job to Load Data to Redshift
Glue Connection Setup:
Go to AWS Glue, and find Data Connections from the left sidebar. Here, we will build a connector to connect AWS Glue to our Redshift Serverless workgroup.
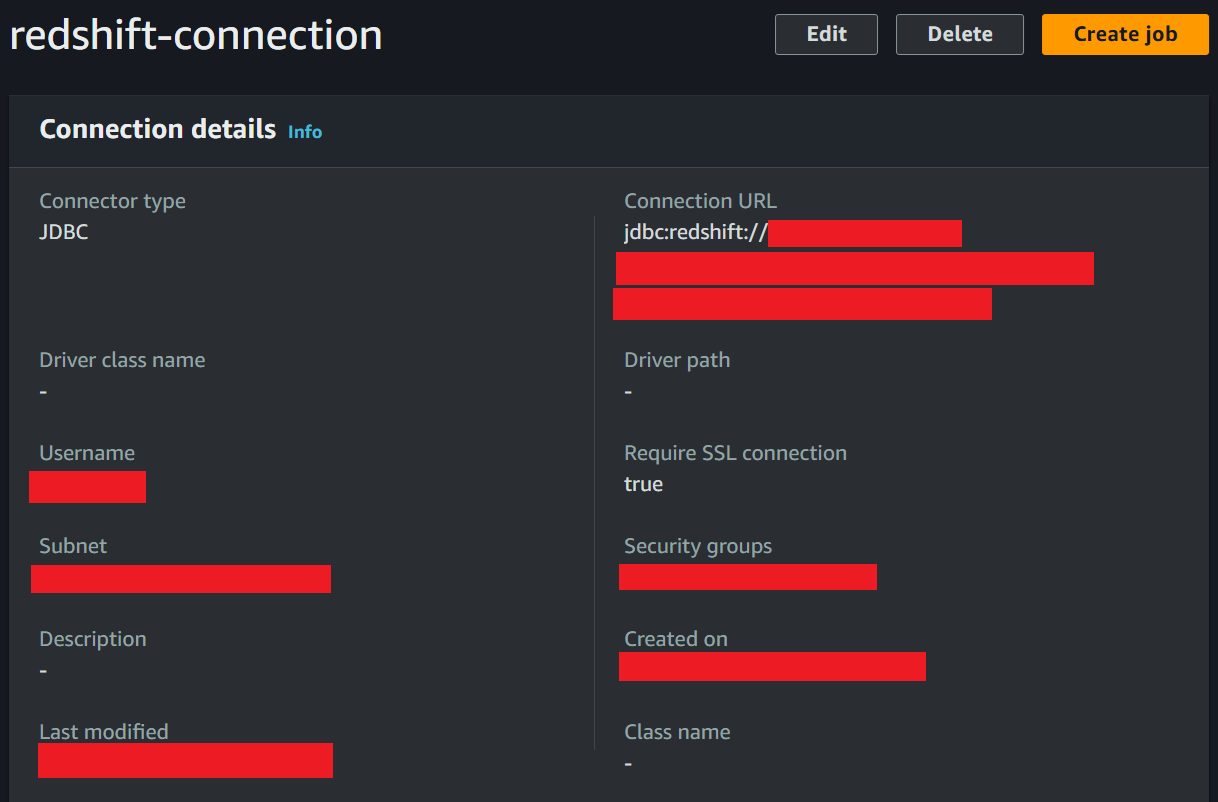
Create a new connection. You can name it redshift-connection. Make sure to use JDBC for the connector type. As for the connection URL, make sure you copy-paste the workgroup endpoint from Redshift workgroup into the connection URL here, after jdbc:redshift://
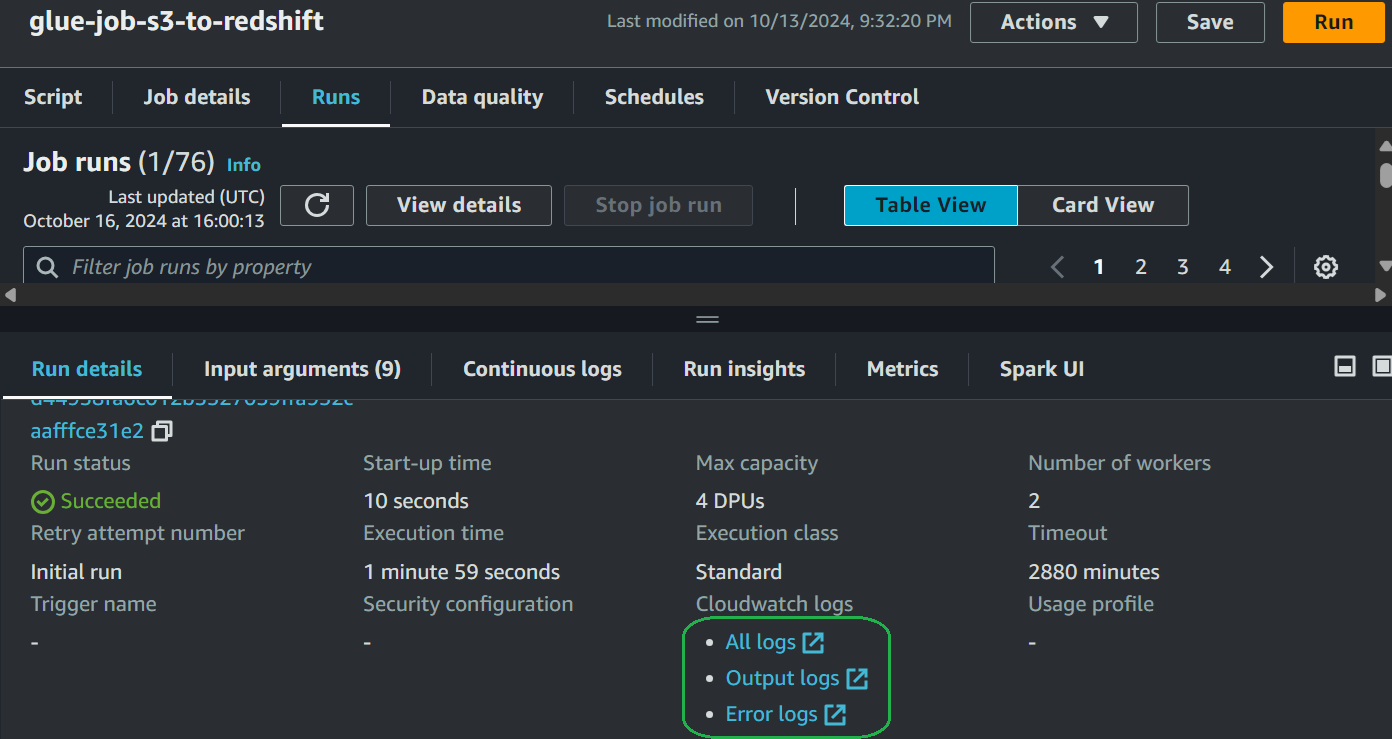
Implement the Glue job that will load the data from S3 to Redshift. You can take a look at my script here: glue_job_s3_to_redshift.py, this script will execute an ETL job where it will extract data from our S3 bucket, transform it, then load the data to our Redshift table.
Use these specifications for the Glue job:
-
Worker configurations: 4vCPU, 16GB RAM, 2 workers (or simply use the most minimal settings)
-
IAM policy: You need an IAM policy that allow the Glue job to access both Redshift workgroup and S3 bucket. Make sure to change the ARN to your own Redshift Workgroup ARN. Check the IAM policy here: AWSGlueServiceRole-GlueRedshiftS3Policy.json
Pay attention to "arn:aws:s3:::aws-glue-assets-880013172391-us-east-1*" in the above IAM policy file. This is used as our TempDir input argument, which will be the temporary directory to store the files before we upload the data into our Redshift table. The S3 bucket that you use as your TempDir in this Glue job should be separate from the main S3 bucket where you store the data from RapidAPI.
Since this is a Spark ETL job, you should always pay attention to the logs to check the details.
Verify data loading. Here's how I verified the data in SQL Workbench/J:
After this, you should create a second Lambda function to help you delete the data inside your S3 bucket that you utilize as TempDir in the Glue Job input argument. You can check my Lambda function that is designed specifically for this task: lambda_delete_temp_dir_data.py
Then, for the associated IAM role of this new Lambda function, make sure to give it enough permission. Check my IAM policy here:AWSLambdaRole-LambdaTempDirDeletePolicy.json
Step 5: Set Up Step Functions State Machine
Since we have created all the necessary steps, time to go to Step Functions to create a state machine definition to put everything together.
State Machine Definition:
For the State Machine definition, you can use my json file here and adjust accordingly: step_functions.asl.json
The above state machine definition file will create this design:
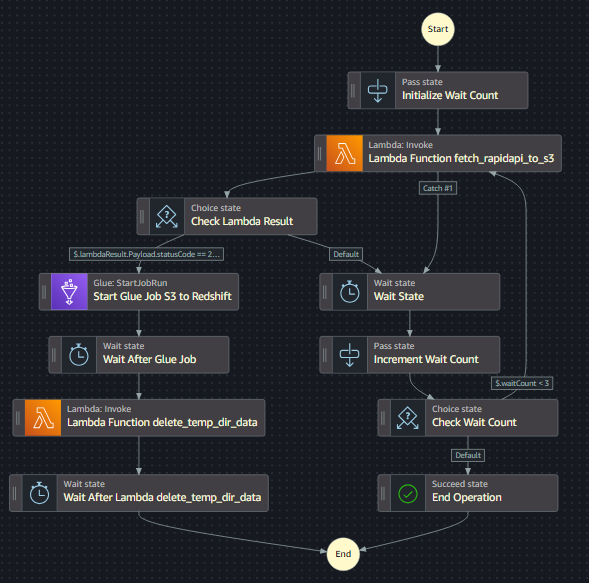
The state machine will begin by invoking the first Lambda Function. When it's successful (with status code 200), it will continue with the Glue job (ETL from S3 to Redshift), followed by the second lambda function (delete TempDir data).
If the first lambda function fails (typically when the API call has issues), it will try again after waiting for some time. It will try several times before it will end the entire execution if it keeps failing. You can modify the wait count number from 3 to any number that you feel more ideal for your case.
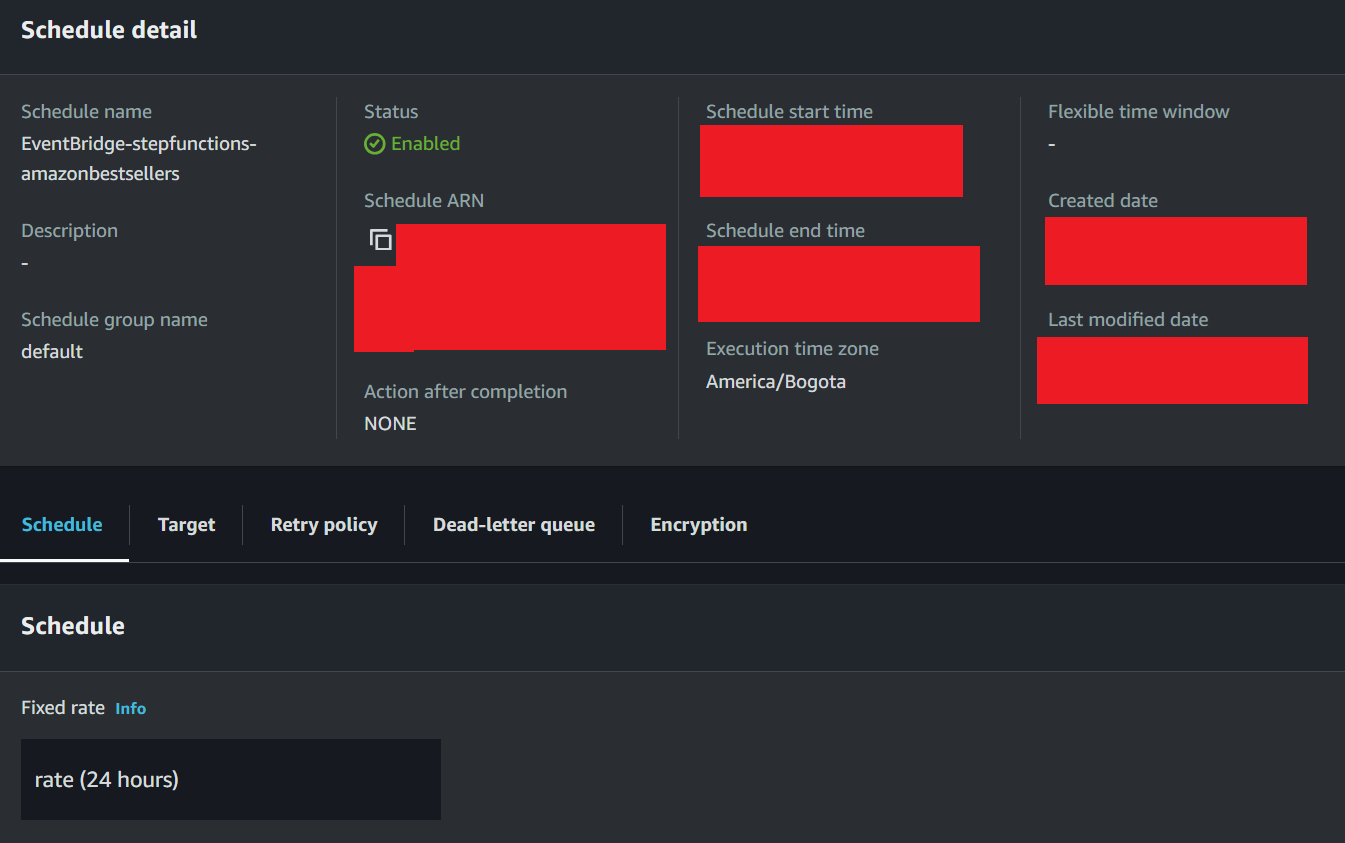
Step 6: Configure EventBridge
You can assign your Step Functions state machine to EventBridge scheduler to automatically execute the state machine periodically. You can configure EventBridge to execute the state machine every 24 hours like this:
That's pretty much it! Now you have a fully automated data pipeline that only utilize AWS services. With this pipeline, you can expect to get new data stored into your S3 bucket and Redshift every day.
To visualize the data, we at Datara can utilize well-known BI platforms such as AWS QuickSight and Power BI.